Sunday, October 14, 2012

An Array of Students

Two days ago, we started our new chapter on multiplication. Naturally, I had scanned Pinterest for ideas and graphic organizers to get me started. And naturally, I found just what I needed. The lesson went off without a hitch. We discussed the needed vocabulary; multiply, factors, products and arrays. We made charts of groups, arrays, multiplication sentences, related addition, etc. All went swimmingly and they seemed to get it. Yeah!

Yesterday, the math lesson focused on making and using arrays. An array in when objects have been organised into columns and rows (I must confess I'd never heard of an array - although I've been using them all my life -so have you.) Anyway, I digress.

The day started with Language Arts and it was the last day of unit. The kids (yes, sometimes I call them kids - students is too bookie and kiddos - well, is a little over done) needed to be put in groups to  share their thoughts on their favorite stories in the unit. Lightbulb! Ding, ding, ding! Groups - multiplication - 1 guy is absent that means 28 students to group - yes I'm saying EQUAL groups!! Can't pass up this teachable moment, can I?

So, I asked them, "How can we get all 28 of you into a group and have equal groups?" Their little lightbulbs went on ding, ding, ding! I wrote the #28 on the board. A volunteer suggested, "We could have 14 kids in 2 groups." YES. I wrote 2 x 14 = 28 on the board, then drew 2 groups each with 14 dots and asked," Hm-m. How does that look? Would those be good working groups?" A couple of yeses but louder no's. The no's explained there'd be too many in a group! (I was having so much fun.)
Volunteers went on to explain how to make those 2 groups smaller until we ended up at our desired 4 groups of 7. We made all those connections on the board. They moved into groups and book talks. Yeah!

NOW, here's the connection. When math time started, I reminded them of the morning's grouping activity and suggested that we could make a student array, using our morning groups. There was a general mummer of excitement and approval. So, I told them to return to their grouping positions quietly, (the quietly was a little difficult but they tried - such excitement.) Once in their groups, I began lining up one group into our biggest floor space ( you'll see, it was tight.) When the kids saw what I was doing, they lined themselves up and waited to be called. We got our 4 lines of 7 students each lined up - 28 smiles, I love it! Then, I brought out the camera to capture the moment. That created more excitement and was a little challenging; they all wanted to be seen and kept moving out of line. Not looking like columns! I sent a couple of tall ones to the back, but had to explain that the important thing was to see clear columns in our photo (to line everyone up by height would be just too time consuming.) They got with the program, we got our photo!

Monday, we'll follow-up by making the related multiplication and repeated addition sentences for our photograph. Then fill in the graph for 4 x 7 (see graph below.)   Good Day.

multiplication chart  When I uploaded this to Google Docs something got lost in translation. But it will give you the idea.

Saturday, October 13, 2012

"Whew."

Well, life has been a whirlwind! I'm so glad I started this blog over the summer 'cause it would never have been started in the fall. I knew switching to a new grade would be challenging, but I didn't realize what a huge leap it would be from 1st grade. On the surface, most of the elements are the same. But they are certainly not taught at the same depth. I've had to reactivate knowledge that has been sitting dormant in my brain for a very long time- and I'm loving it!

There have been days where I've feel inadequate - where things just aren't clicking fast enough and the curriculum is going at break-neck speed. At the end of the day, I sit down and say, "What happened?" But then, it all started to fall in place,"Whew." I'm glad I've reached the "Whew."

I knew I had reached that day when I looked out over the room, and each and every one was silent - focused - and completely into their activity. They were so intent. Not the intent of  "If I don't get this done I'm failing." But rather the intent of interest and joy of learning. And my brain said, "I love this moment."To be able to stand there and think that thought in a busy day is a great feeling. I was so moved, I had to write it on the board. I didn't want to forget that moment. And I wanted to make sure that I remembered to share just how proud I was of them.

Wednesday, August 29, 2012

Official Prep Day


Official Prep Day over.

8:30  am ½ a poppy muffin and a mug of coffee. Thanks Admin. Food always helps a morning meeting feel.

11:00 our time. I return to my cyclone of a room and want to start cleaning up and finish my boards, but I want to know who my kids are more. So, a quick trip to the office to preview their files. I love that we put a school photo in their files each year. It helps with that first visual connection. I also tend to remember their names faster. Okay – now I can finish my room.

Here are photos of my main bulletin boards:
    To the far right is my Concept/Question area. I think this is unique to the Imagine It!/Open Court programs. It serves as a good way to help students make connections to the unit theme. Unit 1 is Friendship. 

    Next is the Vocabulary area. In 3rd grade we sort the words by parts of speech. 
   Then comes the High Frequency Word Wall. Notice that I use push pins to secure the words. I trap each word between the pins so we can remove them easily and use as flashcards. 
    To the far left is my computer/ writing area. This is still a work in progress.(not shown)

Now I can clean my room. Will I ever be ready?


Saturday, August 25, 2012

Reward Beads

Okay, it happens. I sometimes, albeit not often, I have moments of brilliance. I've been doing a lot of pondering about classroom behavior and I wanted to add another tangible reward  to encourage a year of good behavior. Well, I was wandering the aisles of JoAnn's craft store and passed a wall of beads and accessories. I paused, my head tilted slightly to the right while my mind tried to connect to some recess in the mind - and yes - the lightbulb went on! 

Last year, some friends and I walked at a cancer fundraiser. Each time we completed a lap we got to pick a bead to add to our walking ribbon. Doing! Doing! Doing! That's it! For each week of positive behavior they earn a new bead! 

Reward Beads
My sample only has 30 beads 'cause lets face it , I'd never get all 37 beads. 

Here's how it's going to work: There are 37 weeks of school. I will keep a daily log of each student's clip position. At the end of the week, if their clip has stayed in the positive zone each day, they'll earn a bead. With their 10th bead, they also get an initial bead. Hopefully, by the end of the school year, they will have earned 3 initials. Many of my students have 4 names - they'll just have to decide which middle initial to use.

Here's what you'll need:
                    a lot of beads
                    alphabet beads
                    plastic cording 
                           or ribbon 
                           or lanyard strips
                           cut into 15" strips
                    lanyard hooks

I'm going to start start each student off with one bead for incentive. My question is- Where will they keep them?  In their pencil boxes? Hanging near the behavior chart? Any suggestions?
It's 4 in the morning and I can't sleep! Arg! I tried emptying my mind, deep, slow breathing, and relaxing with my lavender/flax seed mask on my eyes (that usually does the trick.) It was all very relaxing - but no dice. I might as well update the blog.

Okay, my cup of Don Francisco's decaf (I still have hopes of  more sleep) Vanilla Nut coffee is ready. Hold on - ah, that's better. Love this coffee. Wish you could smell it.

Well, it's been a good prepping week, but no-o, I am not ready. When I left last night, my room looked like an explosion area. Colored paper here - border strips there - stacks of freshly copied worksheets here and there. And I've been so good! There are still workbooks to be numbered, homework - unfinished work - and spelling folders to be labeled and compiled. Oh, my! It's a good thing we still have a prep afternoon to go ( the morning usually gets sucked up with an update meeting).

I did get my Concept/Question board ready for the Friendship unit. My Vocabulary section is ready to put together, but I ran out of ribbon. I'm using it to divide the words into parts of speech. A trip to Michael's is on today's checklist. I've almost finished a Writing Checklist for my Writing board - just need to laminate and attach the label. It will all be easy to assemble on Monday after the meeting. Oh, yes I want to create a Step-Up-to-Writing model for the board to use on Tuesday. I will post photos on Monday. Positive thinking is good. Yes?

Happily, I had a meetup at the Tin Roof Bistro for appetizers and bocce ball with friends at the end of my day. A perfect end to the week!

Ciao, 'til Monday.

Oh, no. I just remembered - I need a trip to the teacher store to exchange the name strips. The ones I bought have the wrong Q in the cursive alphabet . Think I better log off and start my To Do This Weekend list.

Friday, August 24, 2012

Fluency Clocks

Student reading fluency is a regular timed event around these parts. I used to use one-minute hour glass timers that the school provided. The kids loved them but tended to play with them. Sometimes shaking them so badly that some became 30 second timers due to sand loss.

Several years ago, I found these adorable flower clocks with a bee on the second hand. Kids love them, can't hurt them, and learn clock reading at the same time! I use them during Workshop as a fluency activity. Kids partner up. One person reads aloud while the other listens, watches the second hand, and times the reader for one minute. Then they switch jobs. They  read the same passage a total of 3x each, trying to pass the number of words read each time. 


If you look closely, you'll should see the bee on the orange clock.


I was ready to pitch the old plastic basket. But I saw a scrape of green plastic tablecloth, left over from covering my cabinet, and thought I'd put it to good use. Voila! A little double stick tape and a matching ribbon - a new basket. I suppose I should give it a label. We'll see. What do you think? Label - no label?

Room Progress

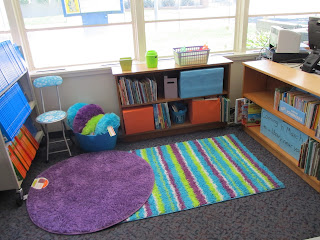
Progress has been made. I'm starting to feel good about my room environment. My color palate is blue, purple and green - but mostly blue. Years ago, my classroom management professor advised us to use blues or yellows and to keep the boards as uncluttered as possible, if we wanted to create a calm environment.  Apparently, students with ADHD are very affected by busy boards and bright colors. 


 All the boards have been papered but not delineated.


 Check out the library. I had fun at Walmart's buying pillows and rugs. And I love the fun stools and chair I found at my local Marukai (only $5.98 ea.) 


I'll use regular student chairs in the computer area, but chairs are always at a premium during workshop.

Now, I have lots of flexibility. The purple rug can be relocated to create a temporary area. The stools will be used to create instant reading areas. And I've already used the chair. It is so light and portable that I move it everywhere. It's better than grabbing a student chair.

Thursday, August 23, 2012

Brag Tag Board

Finally! I'm glad this project is done. It was more time consuming than it should have been. I decided to use a fabric that was sparkly and reminded me of a night sky to show off the star paperclips. But it made the crafting tough. 

Materials used:  an old framed cork board, fabric, stapler, yellow star paperclips, 40 regular push pins, 30 clear yellow hexagon pushpins, clear yellow circle labels numbered 1-30 (I couldn't  find number stickers that were small enough). See post Bag Tag Prep for photos of stars and hexagon items.

 Fortunately, the frame was light blue because if you look closely you can see it in the washed out photo. Next, my helper draped the fabric and stapled the begeebers out of it on the back. Then she stickered each yellow pushpin and trimmed to the hexagon shape. The difficult part came when she needed to line up and space out all the push pins. And the blue pushpins had to line up below the yellow ones leaving sufficient room for the stars to be added. (Note, the second row had to be offset to leave room for small hand to maneuver the stars.) If adjustments were needed the push pins would stick to the fabric every time she tried to pull it out. Bless her - I think she was ready to pull her hair out. The layout was mine - the work was Heather's. The extra 10 blue pins went along the sides and bottom to secure the fabric.  


I couldn't get a good photo. But, hopefully these give you the idea. I may try to update this post tomorrow. I'll make a close up so you can see the pins better. Remember there are two types of pushpins. The clear yellow hexagon ones numbered 1-30 and standard dark blue pins directly below those. The blue pins hold the yellow paperclip stars. We tried to drape the stars over the yellow ones but it was a little tight. 

Tomorrow I'll give it a frame and set it in place.

Wednesday, August 15, 2012

My Primo Helper

Love that my daughter/helper came to work with me today. Heather has been helping since she was in 7th grade, my first year of teaching. Sixteen years later and she's still my primo helper. Although, there have been years she wasn't so willing, especially the year she got burned-out on tearing out, folding, and stapling a million little books. I have learned not to give all my grunt work to a willing helper but rather to mix it up with a fun project or two.

Today, we stopped at SAS on our way to the school. SAS is one of our favorite places to browse. It is a funky fabric store that has tons of discount fabrics and notions. I decided not to use bulletin board paper for this project. In my Brag Tag post, I noted that I was going to use black paper. But instead, I found a rich midnight blue fabric with matching shiny dots. It is really going to make those stars pop! 

When we got to school, we took a few minutes to put all the student desks in their spots. Then, I asked Heather to work on the Brag Tag board.  I shared my design vision, she added her own artistic insight, and I set her loose. We worked for a couple of hours on our projects and when it was time to go she looked up and said, "Today was really fun. It's been so long since I've crafted."  

Yeah, success! Heather had fun, I got some work done and the Brag Tag board is looking great. I just need to buy a trim and number my push pins (tonight's homework).

Tuesday, August 14, 2012

Brag Tag Prep

One of the school-wide incentives offered for our students are Brag Tags. These are colorful dog tags the students can earn during the year. They collect them onto a chain that they wear to our various award assemblies. The past couple of years, I've stored them on pre-existing clips that were hung up in the room. This year I want to showcase them and make them accessible to the students. 

Here's the plan:  I'll start with a 2' x 3' bulletin board hung lengthwise. 
                            Cover it in black paper.
                            Trim the edges in gold.
                            Insert push pins in 2 rows of 15 and numbered 1-30.
                            Each student will get a star-shaped paperclip added to their chain as a hanger. 

That was my original idea accept I was going to use blue paper and no paperclip. But look what I found at Office Depot!
 Yellow hexagon push pins and yellow star-shaped paperclips.

The photos also shows the clip dimensions and the spacing I'm going to use.
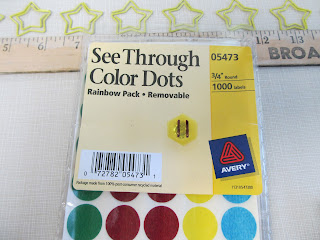
 Notice the pushpin pushed into the dot package. I tried to number the pushpin directly but the surface has a dip in it. Luckily, I had these See Through Color Dots. I wrote the number onto the yellow dot and placed the dot on the pushpin. Then, I trimmed the dot to fit. I considered not trimming it, but it will leave a sticky underside.
 You can see I didn't do a great trim job on this one.


I tested it on both backgrounds and think I'll go with black. The stars stood out better. Plus, we'll be studying the solar system this year and this will hopefully look like the night sky. I'll post the finished product in a couple of days.
 

And So It Begins!

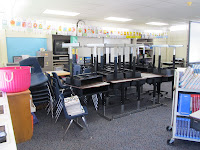
                                                               Yikes, what a mess! My desk is completely hidden behind that mass of furniture.
Doesn't it look like there is a ton of space?

The first job of the day was to remove the unwanted soccer materials. That was easy, they went straight on to the patio.


Next, try to remember where I wanted the student desks, and then clear a path to my desk


That's better. Not done though. I only put half of the desks in their place. Since my daughter, and my primo helper, offered to help,  I'm trying to save things for her to do in a couple of days. She'll take down the top desks and put them in place. Plus, I know she'll help with all those bulletin boards.


Voila a teacher desk!

Notice the work in progress on my desk? I'll tell about that in my next post. Aside from relocating the Smartboard (yeah) and the u-shaped table, I was done rearranging furniture for the day. It's a good thing I have two weeks before school starts. 

Monday, August 6, 2012

 For 16 years I have taught first grade, but will be a third grade teacher this coming year. Yippee!! I'm excited for this new challenge, and okay, I admit it a little nervous, too.

 For a couple of weeks after school's end, I relocated all my materials and stuff to my new classroom and actually found a place for everything. Then, I perused the third grade teacher's guides and made tons of notes. Now, I am in the process of deciding the best way to pretty up the room. My goal is to create a room that is neat, functional and inspires my new kiddos. 

Thank you Pinterest and all you fellow teachers who have shared your great ideas online. I am inspired and hope to put some of your ideas to good use next week. I'll let you know how things go and do my best to post some photos.

Wish me luck!